Just another Tensorflow beginner guide (Part1)
Just another Tensorflow beginner guide. As for myself I found it is difficult to find a step-by-step, easy to follow and practical-things-focused guide on Tensorflow 1.0, I decide to note some stuff down while learning Tensorflow so hopefully it can help me or somebody else out there as well.
You are expected to have some Python background to be able to follow this guide. And it is for mac users. Linux and Windows user will need to change some of the installation commands accordingly. But those information are easy to find.
Part1 - Installation and simple example
This tutorial is mean for Tensorflow 1.0.1 with Python 3.4. Other version might work as well but I highly recommend you try use the same version to avoid potential issues.
You are welcome come to leave comments below and I will try my best to update the post if it can help others.
Before following the following guide, you might also want to take a look at the official installation guide as well at www.tensorflow.org/install/install_mac
Install Python 3 (highly recommended)
As Python3 have many good features, let’s just install the latest version of python 3 from www.python.org/downloads first. Head to the link then click the download v3.6 button for example, then install it.
Afterwards you should have this output in terminal:
$ python3 --version
Python 3.6.0
It’s totally okay for now if your python --version is still 2.7, we will use virtualenvs later to make sure your python --version will output version 3 info.
Install virtualenvs (highly recommended)
This virtualenvs is highly recommended as it allows different projects on your computer to have different Python environment. You may checkout this http://docs.python-guide.org/en/latest/dev/virtualenvs/ or just do:
$ pip3 install virtualenv
Install autoenv (highly recommended)
This autoenvtool is also highly recommended as it automatically switch the correct python environment for you when you cd into a folder. It uses a config file called .env file in your project directory, to switch shell Python environment to desired environment. Check it out here at https://github.com/kennethreitz/autoenv or just try install like this:
$ brew install autoenv
$ echo "source $(brew --prefix autoenv)/activate.sh" >> ~/.bash_profile
Create a Python env for your Tensorflow learning project
Good, now we almost have everything ready, close all the shells you have opened and open a new one (which will make sure all the previous installation applied).
Then make yourself a project folder for continuing with. I will call my tf-learn (you can name it whatever you want), and in that folder, we create a virtual environment called tf-venv (again, you can name it whatever you want)
$ cd tf-learn
$ virtualenv -p python3 tf-venv
Then make a .env file to make autoenv work for you:
$ echo source `pwd`/tf-venv/bin/activate > .env
$ cat .env
You should see some output like source /Users/fuyang/Workspace/tf-learn/tf-venv/bin/activate
Then, simply try cd one more level up and back again:
$ cd ..
$ cd tf-learn
autoenv:
autoenv: WARNING:
autoenv: This is the first time you are about to source /Users/fuyang/tf-learn/.env:
autoenv:     source /Users/fuyang/tf-learn/tf-venv/bin/activate$
autoenv: Are you sure you want to allow this? (y/N)
just input y and enter. Then you should see (tf-env) shows up in front of your bash note. (Remember you can use command $ deactivate to deactivate the environment anytime you are within it, for example when you cd into other directories and you want your $ python --version to be system version again.)
Verify again with these commands:
$ which python
/Users/fuyang/tf-learn/tf-venv/bin/python

$ which pip
/Users/fuyang/tf-learn/tf-venv/bin/pip

$ python --version
Python 3.6.0
If you have info show up like that, perfect.
Install Tensorflow v1.0.1:
More info here https://www.tensorflow.org/install/install_mac or just do:
$ pip install --upgrade https://storage.googleapis.com/tensorflow/mac/cpu/tensorflow-1.0.1-py3-none-any.whl
$ pip show tensorflow
Alternatively if you want to use a newer version of tensorflow then just do pip install --upgrade tensorflow instead use the url with pip shown above.
pip show tensorflow Should now output info such as:
Name: tensorflow
Version: 1.0.1
Summary: TensorFlow helps the tensors flow
Home-page: http://tensorflow.org/
Author: Google Inc.
Author-email: opensource@google.com
License: Apache 2.0
Location: /Users/fuyang/tf-learn/tf-venv/lib/python3.6/site-packages
Requires: numpy, wheel, six, protobuf
Congratulations, now you have a tensorflow 1.0.1 installed.
A very simple example:
Now let’s take a look at a very simple example. Before going further, you might want to checkout these links to learn more from there: https://pythonprogramming.net/tensorflow-introduction-machine-learning-tutorial/ http://jorditorres.org/first-contact-with-tensorflow/
Never the less, let’s try this simple example in a file example-1-basic.py then run it with python example-1-basic.py
# example-1-basic.py
import tensorflow as tf

a = tf.placeholder("float")
b = tf.placeholder("float")

y = tf.multiply(a, b)

with tf.Session() as sess:
    result = sess.run(y, feed_dict={a: 6, b: 7})
    print(result)
By running it you should see an output of 42.0. (You might also see some tensorflow warning messages but I think we can neglect them for now.)
Great, now we have a tensorflow super basic program working!
Let’s try monitoring what Tensorflow does via Tensorboard
You might have used IPython notebook before and enjoy doing the interactive way of making models or doing calculations. However tensorflow works a bit differently with normal python code. In a naive way to speaking, it seems to me that the tensorflow API makes you to plan your calculation job then you will need to open a session and let your calculation job run in that session, during which time the values of parameters you defined might not be directly exposed to you.
In that way, the calculation can, perhaps run very efficiently, but you loose the accessibility of your defined parameters. In this sense, using IPython notebook with tensorflow might be not the most sense making way. (Again, I am new into this, so you are welcome to commit with a different opinion :) )
Lucky enough, Tensorflow has provided us a tool called tensorboard to help us monitoring the calculation and also visualize the calculation plan.
Let’s try a simple example to see if we could use the Tensorboard to see it’s plan (or perhaps more precisely, it’s graph) illustrated.
In the previous example-1.basic.py code, add a line after import tensorflow and a line just above sess.run()
# example-1.basic.py
import tensorflow as tf
from datetime import datetime

LOG_PATH = './tmp/example-1/' + datetime.now().isoformat()

a = tf.placeholder("float")
b = tf.placeholder("float")

y = tf.multiply(a, b)

with tf.Session() as sess:
    # create log writer object
    writer = tf.summary.FileWriter(LOG_PATH, graph=graph=sess.graph)

    # perform calculation
    result = sess.run(y, feed_dict={a: 6, b: 7})
    print(result)
Then open another shell terminal and cd into tf-learn folder (you have to do this under directory tf-learn otherwise check the --logdir parameter carefully and make sure it targets the same defined in python code LOG_PATH), you can run
$ tensorboard --logdir=./tmp/example-1 --port=8001
to start Tensorboard.
Now, run your code again with python example-1-basic.py then open localhost:8001 in your browser and go to the tab graphs then you should be able to see this:
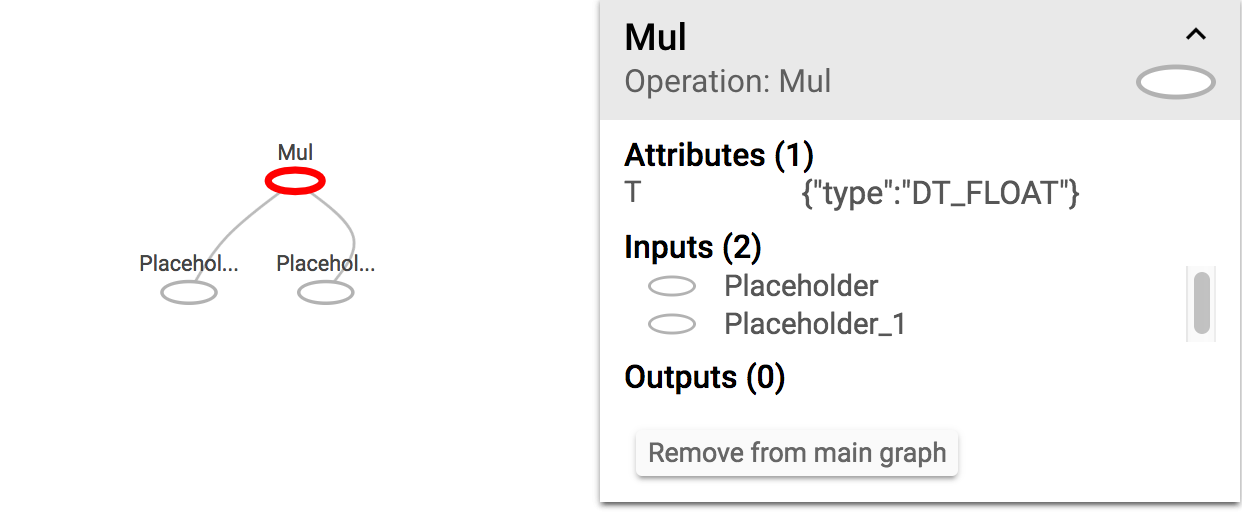 Tensorboard graph
You can click on those nodes to check for some extra info. Note that those note labels are still original data types and operation types. You can make them more easy to read by assigning name attribute when declaring.
For example, we can do something like this:
...
a = tf.placeholder(tf.float32, name='a')
b = tf.placeholder(tf.float32, name='b')

y = tf.multiply(a, b, name='y')
...
Then press the “refreshing” button (or you may need to refresh the Tensorboard page), you should be able to see a new run result, selecting that result then see the graph with labels named as a, b and y
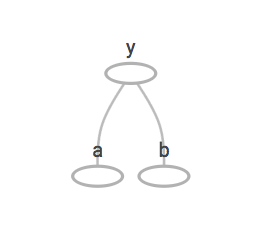 Tensorboard graph with names
More about Tensorboard - watch the change of a scalar
Now, let’s try to do something more. Imagine we are doing a loop of calculation to generate y as fibonacci numbers, and each time we would like to know the value of y and we hope to monitoring it’s change via Tensorboard, you can do something like this (just slight change of the code above):
# example-1.basic.py
import tensorflow as tf
from datetime import datetime

LOG_PATH = './tmp/example-1/' + datetime.now().isoformat()

a = tf.placeholder(tf.float32, name='a')
b = tf.placeholder(tf.float32, name='b')

y = tf.add(a, b, name='y')

sess = tf.Session()

tf.summary.scalar('Value of y', y)
merged = tf.summary.merge_all()
writer = tf.summary.FileWriter(LOG_PATH, graph=sess.graph)

_a = 1
_b = 2
for i in range(10):
    # perform calculation
    summary, _y = sess.run([merged, y], feed_dict={a: _a, b: _b})
    writer.add_summary(summary, i)

    _a = _b
    _b = _y

    print(_y)
You may notice the may difference here is that we defiend a tf.summary.scalar on y and give it a name as Value of y. Then when we do session.run() we pass both merged summary merged and y into it, then it will return a summary and an actual numpy value of y.
Then we write the summary and shift the _a, _b for the input for next round.
Now you can navigate to the “scalars” tab and see your Value_of_y plot:
 Tensorboard scalar plot
And the graph will be updated with a summary output:
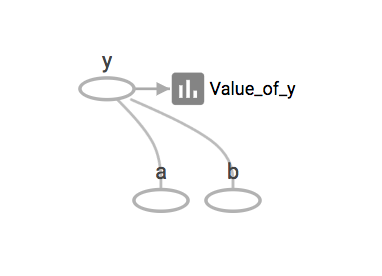 Tensorboard graph with names
Okay, enough for today. At least now you can use Tensorflow to do basic calculations and monitoring the variables. We will continue on with some basic machine learning stuff in the next part.
Thank you for reading so far.